Monday 31 December 2012

Truffle Brownie Bites & Other Treats

 
I love baking and working with fruit. I also love checking out new recipes on Pinterest so I combined these two pastimes to make a few old favorites and new treats as my contributions to the Christmas buffet at our home this year.


Truffle Brownie Cups


For a few years now, I have enjoyed making a Pampered Chef recipe called Truffle Brownie Cups. These are two-to-three POLITE bite chocolate delights (that comment is mainly for benefit of the teenaged son who is prone to eat in a way that I tease him is akin to an anaconda unhinging its jaw to devour its food!). 

Anyway, the Brownie Bites are very easy to make and I can top them with a variety of different goodies. They are not just for Christmas; I have gifted them to my children's school staff, made them for my birthday parties, or shared with fellow chocoholics any time of year.  The main part of TBBs is a dense brownie base baked in mini-muffin cups. These get an indent pressed into them after 10 minutes in the oven, sit a few minutes before being removed from the pan, cooled a bit, are then filled with some delicious chocolate ganache you made and cooled while the baking was going on, and adorned with anything you fancy. Some of my choices have included:

  • mini M&M candies
  • a toasted whole pecan
  • a toasted whole natural almond
  • a few toasted almond slices
  • a chocolate kiss or Golden Bud
  • a twist of orange rind
  • a dried cherry
  • Wilton's decorator sugar Sprinkles
  • chocolate-covered cocoa beans (dark, milk, and white chocolate)
  • white, red, and chocolate candy melts
  • plain chocolatey goodness...[drooling]
Here is my work station.
Some of the cups are filled and some are waiting patiently for their turn.
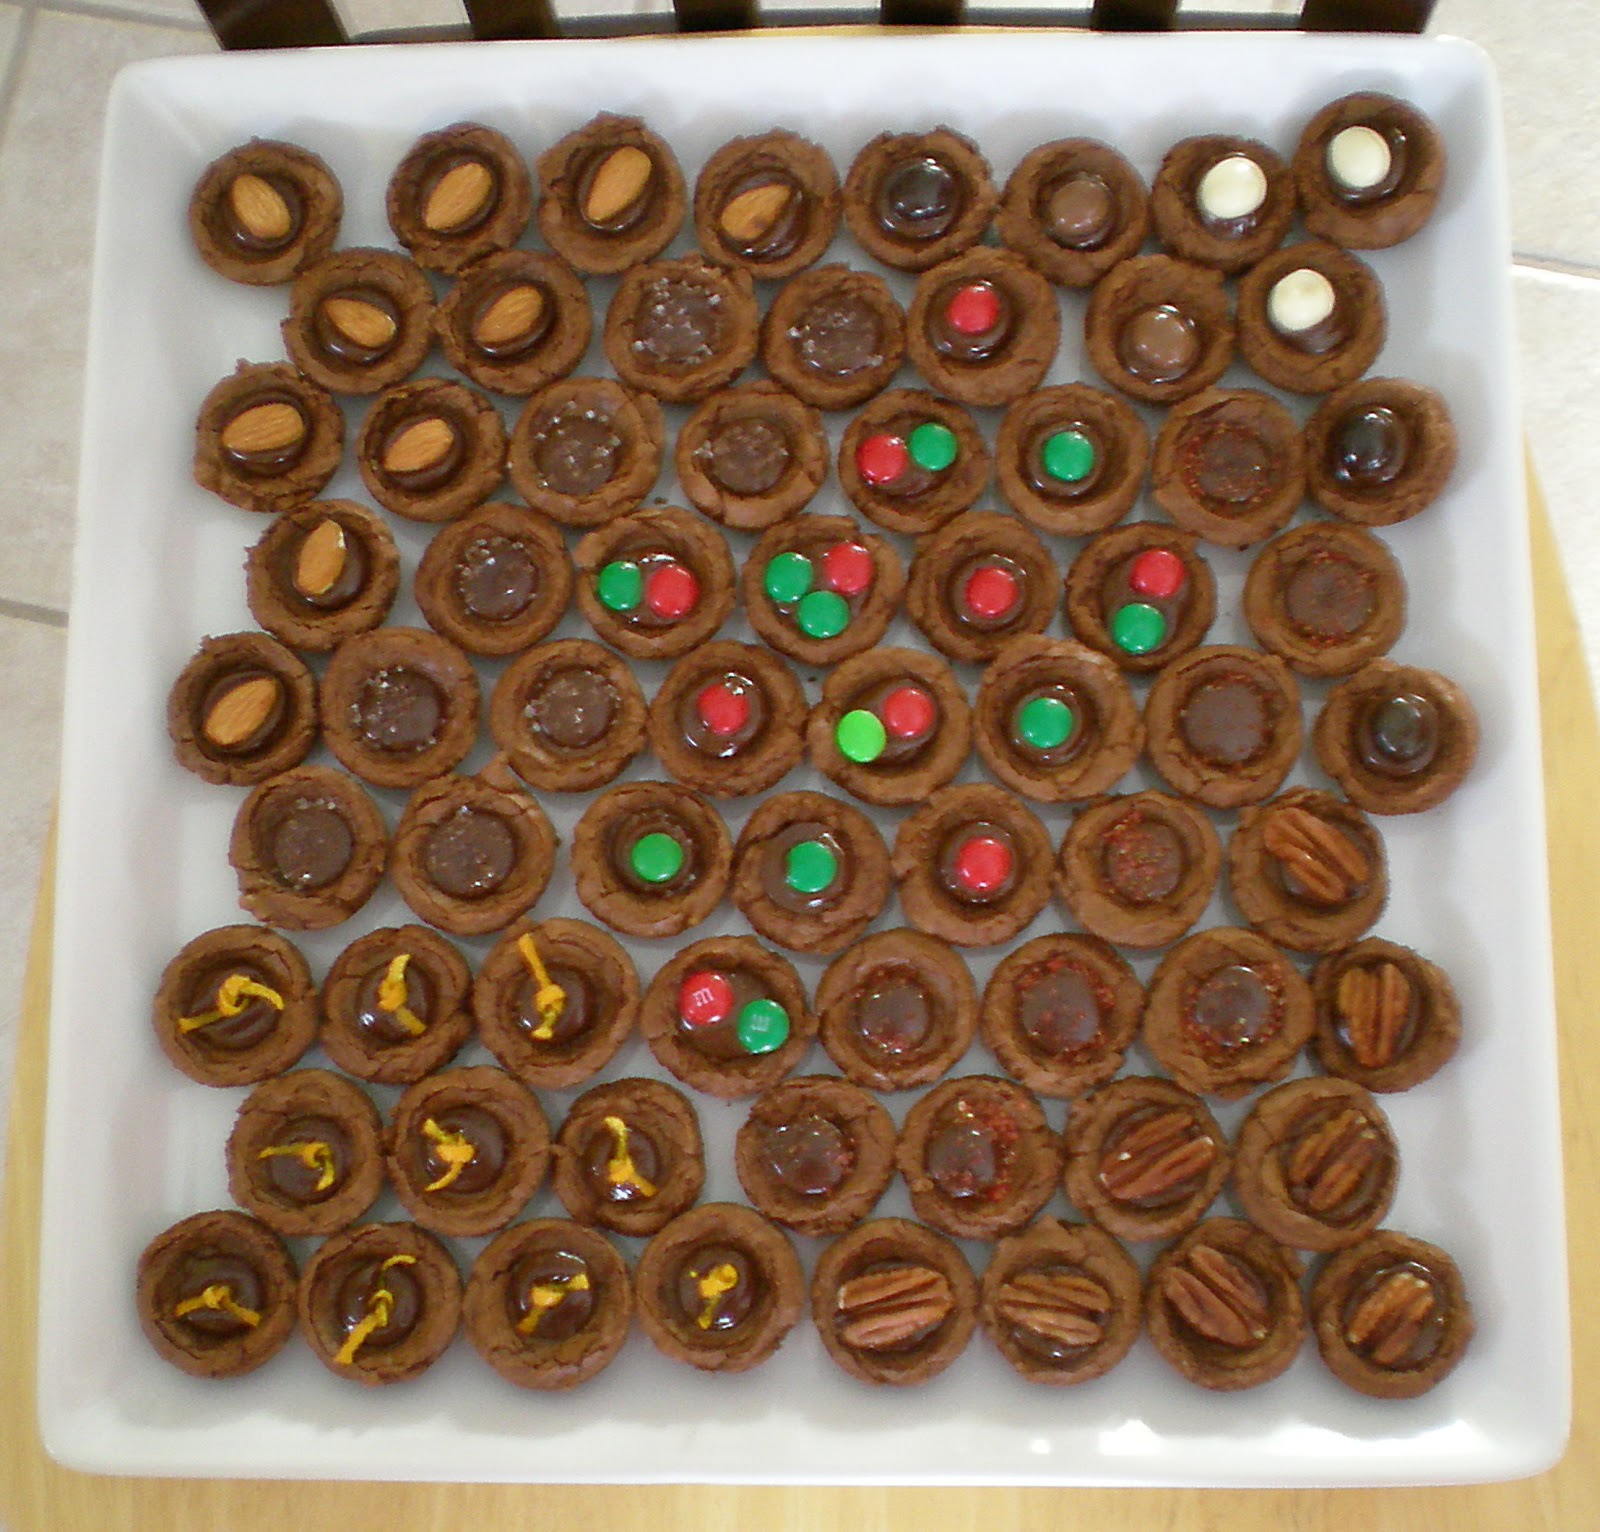
 
Behold the results!
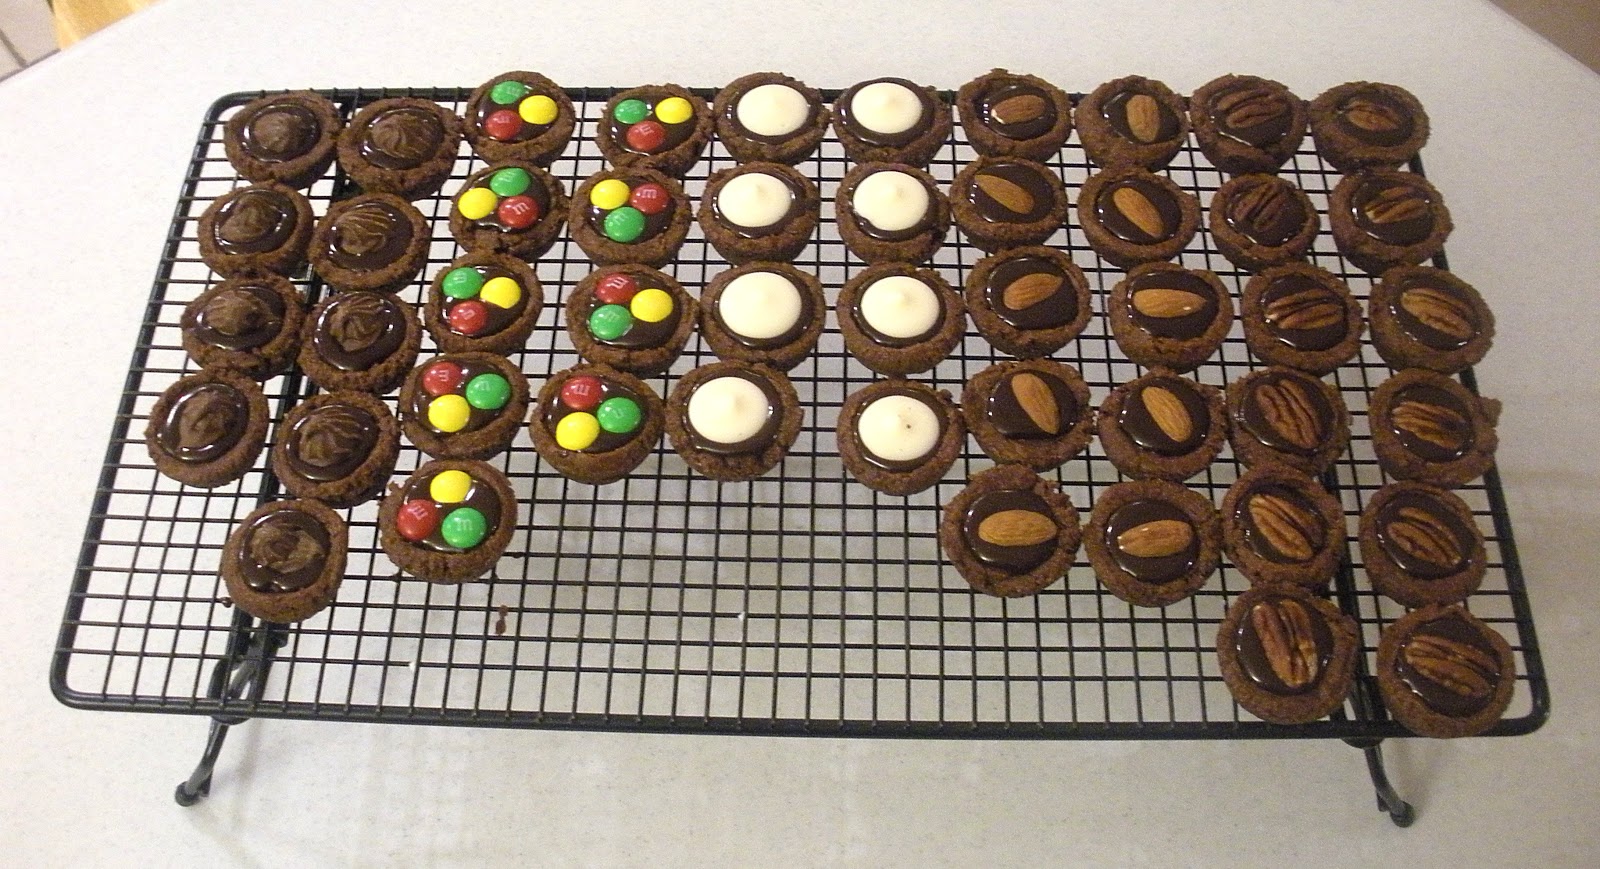
The shot above is from this year and the two below are from bakings past. 
 
 
If your mouth is watering, click here for the recipe for Truffle Brownie Cups!


Confession: I think since teaching my first peanut-allergic student, I began craving foods with pecans, almonds, peanuts, hazelnuts, and the like. I love desserts containing them and salads with a nice texture contrast with a nutty crunch. (I am really careful about what I take to school to eat and only indulge elsewhere, by the way.)  At Christmas, I go to town with nuts in my cooking. 


Peanut Blossoms

 
I missed making one of my faves last year.  This season I had time to bake Peanut Blossoms, a peanut butter cookie ball rolled in granulated sugar, baked (they flatten out on their own, actually a lot more than I expected!), and crowned with a chocolate kiss or Golden Bud while still warm so it melts onto it but the chocolate keeps its shape. 


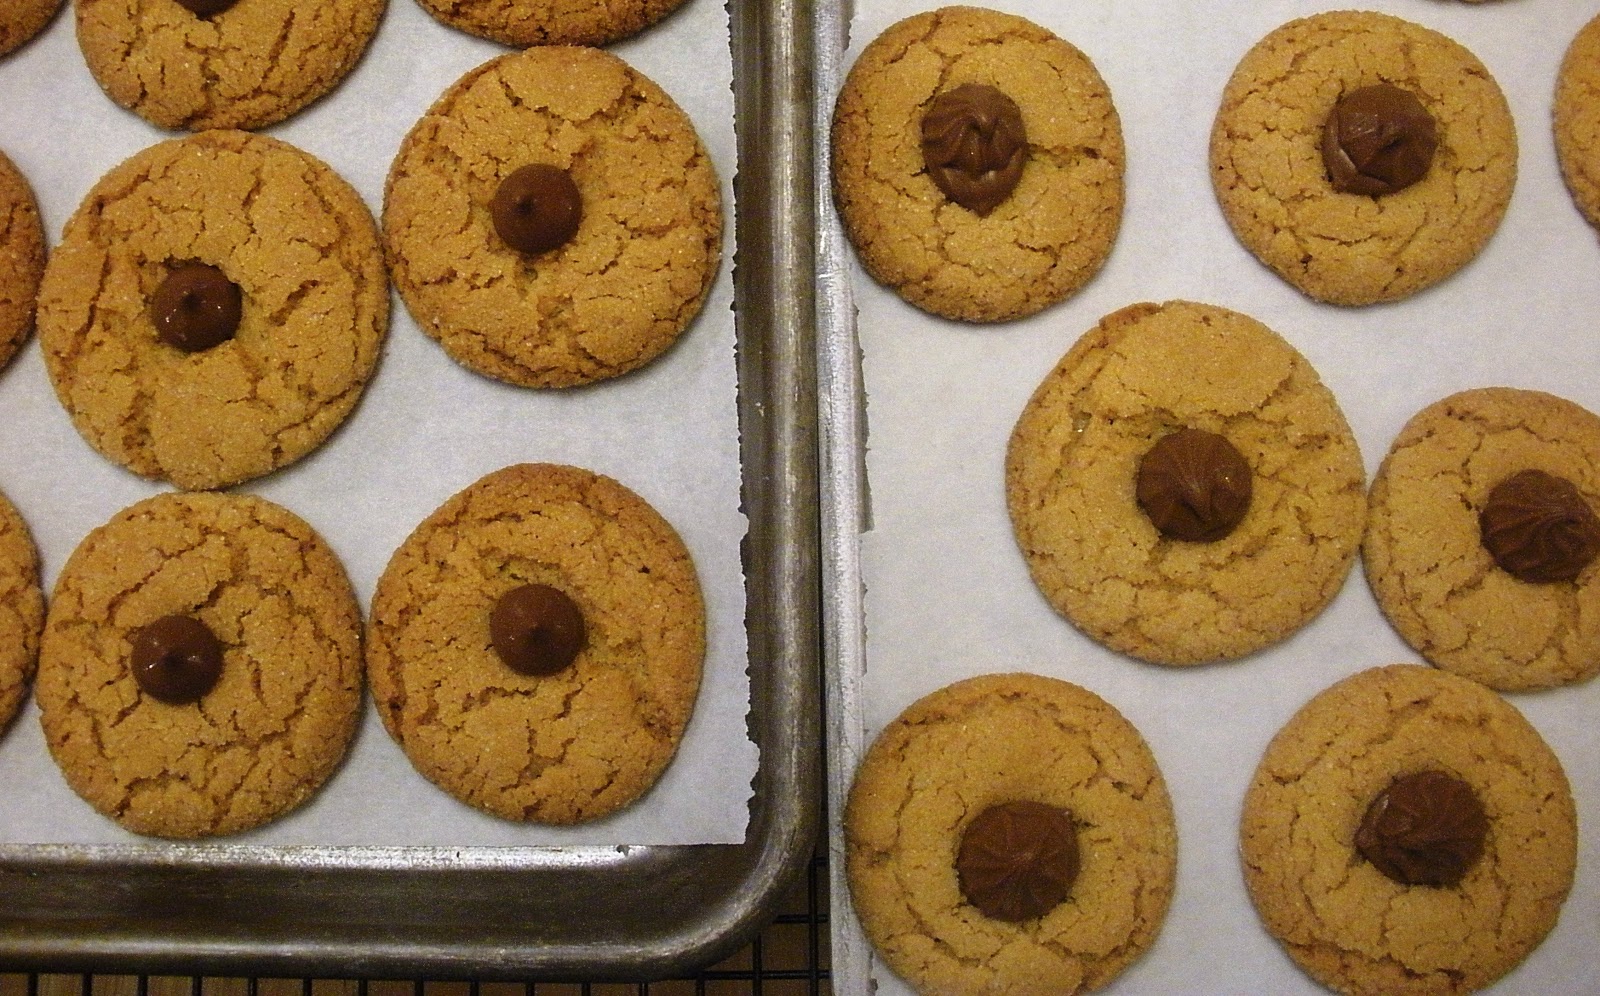
You can see from the initial position of the cookie balls on the sheet how much they spread...a lot more than I was expecting!  The mini kisses are shown on the left batch and the Golden Buds are on the right.  I'll still to the GBs next year - more chocolate per cookie!
 
I also learned that one should be careful to bake these just until set; the education came from my sensitive teeth on the sugary outside and then biting through the firm , overbaked cookie!  The recipe I followed was from the Cookies cookbook from Company's Coming.  I think that was my very first cookbook!  Click this link to the free recipe. (Jean Pare and her kin are generous with some of my favorite recipes, I discovered!)
 

Ice Box/Refrigerator Cookies

 
Two of the new recipes I tried this year were for what are known as ice box or refrigerator cookies. As a child, I remember ogling pictures of these in my mom's cookbooks.  They were also so beautiful!  To create these round, edible works of art, you make the dough, form it into logs, wrap in plastic, and refrigerate for about 6 hours or overnight so it's firm. I let the dough warm up a bit before slicing and baking the rounds. Coincidentally, these cookies were from the new Christmas Cookies Company's Coming mini-cookbook I couldn't resist at the drugstore...it was just too pretty! The varieties I made this year were Cranberry Pistachio and Cherry Macadamia White Chocolate.
 
They were a bit too delicious, however, and I think only two whole cookies made it to the Christmas Day cookie tray!  I will make these again for certain and remember to.
 

Nutella Rice Krispie Balls

 
Continuing on the nutwagon, I also love Nutella. Boy, has that product been in the news for a variety of not-so-terrific reasons this year! Anyway, I enjoy it in moderation. Another Pinterest recipe find was for Nutella Rice Krispie Balls. They were a bit tougher to mix together than regular Rice Krispies' marshmallow goo, but any anomalies in the "batter" didn't matter since you roll it into balls before dipping them in chocolate.


The ingredients for the balls are Nutella, mini marshmallows, butter, vanilla, and Rice KrispiesTo the melted chocolate chip coating, I added a teaspoon of vegetable shortening to make the coating more shiny, a trick I learned when my own children were making chocolate-dipped strawberries for my birthday many years back.  The funky white fork -like tool above is a Wilton's product I bought.  (After a tough cake pop dunking session, I was seduced by the promise of an easier go of future coating experiences!)  As per the recipe from Erica's Sweet Tooth blog, I crumbled some Krispies for the top; some toasted, finely chopped hazelnuts would have been good, too.  Our Nutella Rice Krispie Balls were Goldilocks-worthy: not too sweet, not painfully crunchy as to shred one's upper pallet, not messy - just right! 


I did share a few healthy dishes this Christmas, but I shall give my accounts of them another day.  Who would have thought one Christmas would lead to three four postings? 

I hope you had a sweet New Year's Eve; I won't expect too many at my island tonight as I put this up on the worldwide web! 


Wishing you a 2013 filled with blessings of all kinds,

Jennifer


Inspired At My Island's First Christmas


Merry Christmas, family, friends, and other folks! 

I hope you have had time to enjoy the company of loved ones and some good food to boot.  We hosted my parents, my brother's family, and the family of the brother of my blog-inspiring cousin.  How are those for handles, Troy and Trevor? ;-) 

This Christmas meal, as per the last seven we have hosted since moving to our acreage, has been prepared primarily by my father.  "We'll bring the turkey, potatoes, stuffing, cabbage rolls, carrots, and peas," he informed me again!  It makes my dad happy and he says we're too busy with the kids and work, so we thanked him and obliged.  I have made a turkey in the electric oven my parents gave me (mixed message?!) with no food poisoning experienced by my nuclear family, but my dad's bird-baking ability is tried and true.

Dad even kicked it up a notch with a new style of presentation as you can see.  Gregory looks impressed!

My husband wanted to contribute two traditional Ukrainian dishes.  One was nalysnyky; these are made by mixing dry cottage cheese (as opposed to creamed-style) with dill, perhaps other spices like pepper, even cinnamon, maybe some eggs for added adhesive power for the ingredients, rolling a few spoonfuls of that in many-a-small crepe, and baking them in cream.  My mother-in-law insists that one must boil the cream first so it doesn't overflow the pan in the oven...but you still need to keep an eye on it! 

The second dish was nachynka, a cousin of polenta, prepared by cooking chopped onions, frying the cornmeal a bit, adding milk or cream, perhaps some eggs depending on the version of the recipe, and baking it.  The consistency varies, depending on the cook's family traditions and personal style; sometimes it might be creamy like porridge or perhaps more on the firm side.  I think that the best part of nachynka is the crunchy crust that you might be lucky to get a piece of!  You can see the yellow nachynka on the right bottom corner of this photo.


Both dishes turned out very well and the husband of this blogger was very pleased with himself.  The recipients of the food were satisfied, too.  The feast was also enhanced with a traditional cooked red cabbage dish from the German heritage of Troy's wife, Monica, and my sister-in-law, Nicole, made a sweet-and-tart salad with Granny Smith apples, pieces of Snickers bars, vanilla instant pudding, and Cool Whip.  The salad is the fluffy white delight in front of Little Boy Blue and the cabbage is in the foreground of the graciously grinning girls.  


Hungry people ready for the spread; the Ukrainian          Bob of the Bird and Lovely Lorraine
chef is the handsome fellow in the long-sleeved                         a.k.a. my parents
blue dress shirt.

Now, are any of you thinking, "Jennifer, did you contribute ANYTHING to your family's feast?!" 
I did, I promise!   For the main course, I'd prepared a coleslaw salad from Bon Appetit, but the island was pretty full and I forgot about it until we'd all gone through the line and were well on the way to FULL on our belly tanks' gauges!  The dessert and snack table bore more of my efforts.  However, just in case this post is getting a bit lengthy for your taste, I will share them in the two entries to be entitled "Truffle Brownie Cups and Other Treats" and "Jennifer vs. The Grinch."


Thank you for joining our family's tasty celebration at the island this Christmas and I hope you will be back many times in the coming year!

Jennifer

P.S.  If you'd like an email message when I put up new posts, feel free to fill in the Subscribe section on the right side of the blog.  I excitedly told Larry that I was up to NINE followers.  He smiled and chuckled at me - he knows I'm not in this for the stats and is happy that I am finding joy in this journey. :-)


Sunday 2 December 2012

Happy Treatmas: Gingersnaps

Mwah, mwah, mwah: My blog - have MEESED you!

It has been a crazy-busy fall but I am back.  I've been looking forward to some Christmas sharing, from me to start with, but also from you, I hope, if you have some delicious sweet tradition of your own to tell me about!

I start to feel like baking when December 1st hits.  The rest of the year, I am more inclined to make cakes and other desserts to be sliced up and shared; for Christmas, I love fussing with the individual goodies.

One of the must-makes in my house is gingersnap cookies.  My dad's parents, Howard and Marion Lawton, immigrated to Alberta from Iowa, U.S.A. in 1932.  They became cattle ranchers and lived a simple but interesting life with their four boys and beloved horses.  As a little girl, no older than 9-year-old, my senses captured the typical evening scene in their dining room:  the much-used Scrabble board on the table, sprinkled with fragrant bits of Grandpa's Sail pipe tobacco, half-full coffee cups, a dish of gingersnaps, westerns or mysteries in my grandparents' hands or left open at the last-read page like little tents, Grandma usually wearing a cardigan adorned with a brooch, her hair in a bun, and Grandpa with a bolo tie and a cowboy shirt. 

A display I made for our Lawton family reunion

Yesterday would've been Grandpa Howard's 111th birthday; he passed away on the New Year's Eve before Gregory was born.  Grandma died of cancer when I was in Grade 3, and I remember missing my class' Hallowe'en party for her funeral.  I wish I had had more years with them, but my dad was the youngest brother so I was lucky to have spent as much time with them as I did.  Scrabble and homemade gingersnaps during the holidays are the connections to them I hold dear. 


My favorite cookie recipe is from Company's Company; I found it on their website's Free recipes section! 
  • WARNING: The dough is quite sticky so sometimes I dip my hands in cold water or give them a spray of Pam before rolling the balls. More often, though, I just remind myself, "Oh, yeah, this is the messy part...it'll be over soon..."
  • I usually use the coarse white decorating sugar to roll the cookies in to give them more sparkle and crunch; I make the amount of sugar go further by rolling only the top 2/3 of the cookie in it instead of the whole ball.  Last year, I found and used three varieties of Wilton Sparkling Sugars with beautiful results!
   

  • The yield given by the recipe isn't usually how many it makes for me though I do follow their 1" ball size.  I wouldn't want them any smaller! 

Hard margarine (or butter), softened                      ¾ cup           175 mL
Granulated sugar                                                   1 cup            250 mL
Large egg                                                              1                  1
Fancy (mild) molasses                                           ½ cup           125 mL
 
All-purpose flour                                                    2 ½ cups      625 mL
Baking soda                                                           2 tsp.           10 mL
Ground ginger                                                        2 tsp.           10 mL
Ground cinnamon                                                   1 tsp.           5 mL
Salt                                                                       ½ tsp.          2 mL

Granulated sugar, approximately                            ¼ cup          60 mL

 
Cream margarine and first amount of sugar in large bowl.  Add egg.  Beat well.  Add molasses. Beat until smooth.

Combine next 5 ingredients in medium bowl.  Add to margarine mixture in 2 additions, mixing well after each addition until no dry flour remains.  Roll into 1 inch (2.5 cm) balls.

Roll each ball in second amount of sugar in small bowl until coated.  Arrange about 2 inches (5 cm) apart on greased cookie sheets or ones lined with parchment paper.  Bake in 350°F (175°C) oven for about 10 minutes until just firm. Let stand on cookie sheets for about 5 minutes before removing to wire racks to cool.


Makes about 7 ½ dozen (90) cookies.

1 cookie: 45 Calories; 1.7 g Total Fat (1.1 g Mono, 0.2 g Poly, 0.4 g Sat); 2 mg Cholesterol; 7 g Carbohydrate; trace Fibre; 0 g Protein; 62 mg Sodium

 
Thank you for coming back to my island after the hiatus!  I hope you will take time to have a cookie-baking date with someone you love and raise a cup of coffee to your own loved ones during the Christmas season.  See you again soon!
 
Jennifer

Wednesday 10 October 2012

Hungry for Hallowe'en

I have a confession:  I was holding back some of the photos which could have been categorized in former posts so I could use them for Hallowe'en.  Who was thinkin' ahead?  This girl!

If you are aware of my ophidiophobia and my husband's arachnophobia, you may be surprised by some of this segment's offerings.


Super Snakes

Ssso, I ssspotted these sssuper sssnacks on Pinterest; these were described as caterpillars, however.  Whether you view them as being reptiles or insects, they are really easy to assemble.  I used 6" skewers, grapes, and canned frosting for adhering the mini chocolate chip eyes.

Here are the rest of the fruity friends.
I made them for my class as a reward for positive group behavior.
The snakey sticks were, literally and figuratively, SWEET!  


Serpent Sammies
 
 
Split bread-type cheese sticks, add your favorite ingredients inside, cut forked tongues out of raw red pepper strips, and stick on Cheerio eyes with some spreadable cream cheese.


Silly, Sassy Spiders

I'm so glad I took these pictures of Miriam making cupcakes for her class in 2006...she was such a spunky little pumpkin.  
 
I made standard cupcakes from a cake mix; sometimes I toss in an extra egg or two or substitute sour cream for some of the oil to make the cupcakes more dense.  Crumbly cupcakes are a pain to deal with, especially when little people are eating them!  When the cupcakes were cooled, I iced them with store-bought frosting because it was a busy fall and because I love using the frosting containers at school.  Miriam was in charge of the spider-making.
We used a divided tray formerly used for vegetables to hold the decorations of cut-up laces licorice for the legs and mouths, and gum drops for the eyes. 


I love the sneaky expression she sports in this photo. That look comes from her daddy...the same daddy that likes to tease and would hide in the dark or behind doors or shower curtains to scare them when they were younger...and not just around Hallowe'en! 


I drew spider webs on the parchment paper with which I covered the trays so the creatures had proper homes.

Miriam's spiders showed a lot of personality as well as the charm of assembly-by-first-grader!


Scare-Free Skeleton  (unless you're afraid of vegetables, I suppose!)

Thank you to my friend, Tanya, parent of a former student, who taught me a thing or two about how making the veggie tray choice for shared lunches could be awesome!


Hair = red cabbage leaf sections 
Face = dip in a shallow bowl or ramekin
Eyes = grape or cherry tomatoes
Smile = yellow pepper
Shoulders = narrow celery sticks
Arm bones = lathed carrot pieces
Hands = tiny cauliflower florets
Spine = English cucumber slices
Ribs = yellow pepper strips
Pelvis = mushroom slices
Femurs/Femora = wider celery sticks
Knees = tiny cauliflower florets
Fibulae & Tibiae = lathed carrots again
Feet = grape tomatoes
Toes = broccoli florets


Yummy Mummy Spinach Dip

I made this neat looking appetizer for our church camp's Hallowe'en party last year.  It was pretty easy - you make a mummy shape out of thawed frozen bread dough or pizza dough, bake it, stick on 2 black olive slices for eyes, and melt on torn-apart cheese strings for the mummy's wrappings!  You carve out the bread in the body part, make the cold spinach dip to put into the hollow just before eating, and serve with pieces of bread or the recipe's suggestion, Wheat Thins.  Most spinach dips are heated in the oven in the bread bowl for a while but this one is a mix 'n' serve variety.  Here is the link to Kraft's website and the recipe.  I didn't take a photo of my own creation (rats!) but it did look very comparable to the one shown and the kids at the party loved it.


Additional notes:
  • Try to find a recipe for the rest of the red cabbage head since you will only use a tiny portion of one of its leaves!
  • Ranch dressing seems to be the dip equivalent of cheese pizza...most kids'll eat it.
  • The "lathed carrots" which I refer to are the little ones you buy in a bag.  I loved that phrase when I heard it on CBC last year - such an accurate description!  Usually, they don't taste like much but my church friend, Genia, works magic on them by roasting them with a bit of chopped onion, butter, salt, and pepper in a covered casserole for an hour at 350 F / 180 C.  Yummy!
  • I now know the scientific term for fear of snakes as well as the plurals of fibula and tibia.  I have a new Internet friend - www.wordhippo.com.


Thank you for flying, creeping, and crawling to my island!  I wish you a very Happy Hallowe'een that is full of fun things on which to feast.


Jennifer


P.S.  Gotta go...the Alliteration Police are here, stating that I overdid it this time.


Thursday 4 October 2012

Back-To-School, Now Back to Blog!

Oh, I have missed my blogging!  School is back in full swing and I haven't had either spare time or a clear enough conscience to write since not all of my professional paperwork was finished! 

I work at a great school with great people and, as the September 30 count said, 431 great kids from age 4.5 to 10!  For our initial staff meeting, a few of us decided to make breakfast.  Tracy said I could only bring fruit...I said, "Okay..." and she very knowingly added, "...and not fancy stuff!"  Bummer.  She knows me, alright...but I didn't promise and off to Google Imageland I went.  Somehow I clicked on a website from Russia and after a few hours, I had some imperfect but still-cute apple art to share!


Things I learned during this first attempt:
  • Try hard to choose apples which are very alike in size and shape so your slices line up and the shape of each polka-dotted apple is maintained.
  • Use really sharp tools and practice on some potatoes first before you have crooked cuts or misaligned spots on your fruit canvases.  Some of the apple injuries were reminiscent of my attempts to slice a pizza with a pizza cutter; very few of the cuts matched!
  • People who are your friends appreciate the effort and novelty and say nothing of the imperfections. :-)

I'm not going to write up a step-by-step this time but here are some pictures of my venture:


It was a lot of fun.  I dipped all of the cut pieces in orange juice to try to avoid browning and it worked quite well.  My co-worker, Travis, who has a physical education background and encourages others to pursue healthy lifestyle choices, said that people are more likely to eat cut up fruit versus having to commit to a whole fruit.  Most of my plate was emptied by my friends; I shared the leftover apples with my class and they were pretty impressed and appreciative, too.

Thank you for coming to or coming back to the island after my hiatus and I hope you are having a pleasant autumn season.  My next post will be about Hallowe'en foods which I have made.  In the meantime, why not head to Pinterest for some inspiration?  I love the joke about Pinterest from ragebuilder.com.  I couldn't find the original source so just look for the three block cartoon in this group of funnies; here is a link to it.   I'm not quite that bad but on my Pinterest boards, I have gathered lots of fantastic teaching ideas, helpful home things, and jokes to keep my family and students laughing.  Take care and remember an apple a day might keep the doctor away.  May only your apple skins be spotted or striped, not yours!


Jennifer  


Friday 7 September 2012

Lunch Love Part III: Veggie-licious

Vegetables seem to be the most controversial part of meal time.  Kids especially have a reputation for wrinkling up their noses at veggies, though I seem to be encountering more adults who don't care for many types of them either.  When I taught Kindergarten and we had Shared Snack each day, I must admit that I was frustrated sometimes with the pursed lips of students I considered to be picky eaters who did not want to follow our 3-bite rule.  Since then, I have heard and read that children actually have more taste buds (they wear off over the years), and that it can take up to seven times for us to get accustomed to taste and texture of a new food.  (I don't have any sources to cite for you but I probably heard it on CBC!)  This makes sense; I wish I would have known that information during my K days.  When our own kids began eating solids, every time we presented a tiny spoon of pureed food, we would smile enthusiastically say, "Mmmmm....[food name]...yummy..."  I'm not sure if this aided in our children being open to trying nearly all foods or if we were just lucky! 

I think that vegetables are more likely to be chosen as a snack or take-for-lunch item when they are washed, trimmed, and cut into ready-to-eat pieces.  Most Saturdays when we do our weekly grocery run, I prepare the fruit and veggies and load them up into plastic containers.  This also helps me during the week when I'm cooking; having to clean celery, lettuce, or carrots can be a pain when you're in a hurry.

Colour and presentation are really important.  Although the following photos show veggies for a crowd, perhaps the beauty of the different hues and variety of the arrangements will inspire you and encourage your loved ones (and perhaps you!) to be a little more willing to try them.


Pick A Peck of Pretty Peppers...& Cruciferous Veggies...& Root Veggies...& Cucumbers...


Picking from a big selection can be fun and give your child some decision-making power.  I made this a few years ago, but the arrangement reminds me of the neat idea for toddler meals and snacks I saw on Pinterest this spring.  You take an ice cube tray and put tiny servings of different foods in them, allowing the child lots of choice.  You still control what the choices are, and the little one can graze on what s/he prefers on that day but is not expected to eat everything. 


Rainbow of Vegetables


It was my turn to take the veggie tray for church lunch and I had seen some rainbow-like arrangements via Google images.  Red onions aren't everyone's favorite but there aren't a lot of indigo and violet vegetables!  Raw red cabbage wouldn't cut it. (Please let me know if you have suggestions on fulfilling the representation of the whole spectrum!)


Veggie Christmas Tree
 
Having signed up to bring vegetables for the Miriam's class Christmas party, I got an idea to make a Christmas tree design on a new plastic tray I'd bought for putting goodies on.  One of my students had brought a veggie Christmas tree with the food affixed with toothpicks to a plastic-covered styrofoam cone.  I figured the tray would be a little different and Miriam helped to pick the tree "decorations" when we went to the grocery store.  I was very impressed by her idea to use bean sprouts for the tinsel!  I'd forgotten about our veggie version of cranberry & popcorn garland.  Memories... 


Skeleton o' Veggies

The last one was inspired by Tanya, my student's mom, who brought a vegetable skeleton for our Grade One Hallowe'en party.  Not only did she show how veggies could be arranged to make a picture, she introduced me to the joys of Press 'N Seal.  I love that stuff!   Anyway, I made the face from a ramekin filled with dip and that's red cabbage hair as suggested by the Kraft Canada website.  It has this skeleton and lots of other fun party food ideas; I linked the site to the Yummy Mummy Spinach Dip which I made for our youth camp Hallowe'en party last year.


School is back in but I'm making an effort to keep taking time to enjoy writing and creating a post per week.  Thanks to everyone who has mentioned that they like reading the blog; it makes my day. :-) 

Thanks for nibbling your way to my island.  See you again soon!


Jennifer

Tuesday 4 September 2012

Lunch Love Part II: Mains

Just before I get into Sandwiches & Friends, I have an addition to the Fruit Fun entry!  I tried editing posts but the spacing between paragraphs and photos goes crazy and it takes a lot of time to repair the damage.  Therefore, at some point, I will be started a post of post-post notes.  Ha ha!  Perhaps you could offer me a more interesting title, preferably alliterated.

Anyway, I had offered to bring fruit for our Back to School Staff Breakfast.  I wanted to include a few fruits including apples.  Whole apples don't usually have a lot of takers at buffets so I needed to pretty them up as well as avoid yucky browning.  I searched "apple art" and found some neat layered and polka-dotted ones from a site in Russia.  Here are my first-attempt versions:

Stripes!  I cut a few different types of similarly-sized apples into thick slices and mix-and-matched the pieces after giving them a quick dunk in orange juice.

Spots!  Using my Core 'N More, I used the small end to carve out dots from different colors of apples, bathing the dots in orange juice as per the slices, and then popped them into contrasting-colored apples.  


It was a lot of fun to play with the apples!  
The final presentation...


The Main

Do you or your kids find sandwiches a bore?  If so, you have a lot of company.  For holidays at our school, some classes have shared lunches for which families sign up or are assigned a certain part of the meal; this may sound regimented but otherwise we would have 75% of the class bringing cupcakes and other treats, myself included!   One year at Hallowe'en, it was my turn to supply the main dish for Miriam's class.  Having sandwiches for yet another day seemed a bit sad for what could have been a more festive meal.  I looked around the bakery for non-bread offerings and spotted the cheese breadsticks.  They were kind of long and flat.  Now I have quite a phobia of snakes so my idea even surprised me...


I split the breadsticks, spread the tops and bottoms with the desired condiments (usually mayo and "paint mustard," as my chef friend used to call it), and filled them with ham, cheese, and lettuce, cut to fit.  To snake-ify them, I cut strips of fresh red pepper into forked tongues, inserting them in the ends of the buns, and adhered Cheerio eyes with cream cheese.  I cut the buns in half to serve the hungry 7-year-olds; you have to leave room for cupcakes, right?

There are extensive lists of creative lunch ideas if you search; those bento box meals look amazing but I'd have to make three each for my own kids to satisfy their teenage appetites!  I'm just going to include a few of my family's and former students' non-bread loaf faves here, hoping you'll see a few things you'd like to try. :-)
  • Bagels:  Split the traditional way (don't end up in Emergency - use a cutting board, please!), and toast a half per child (they have very dense carb content - the bagel, not the kid).  Spread with jam, cream cheese, pea-butter, or cover with grated cheese and toast them.  You could also make a little pizza out of a bagel half.  Alternately, cut the bagel vertically into finger-width coins.  They could be toasted for crunchy little bites to enjoy or even made into tiny (sorry, "s-word" coming up) sandwiches with something simple like the spreads mentioned, Cheez Whiz, pea-butter and banana slices, or banana slices and strawberry jam.  If you don't mind a little more work, use a toonie-sized circular cookie cutter to make pieces of meat or sliced cheese to fit in the bagel bites.  That's a better alternative to the s-word!
  • Breadsticks, Cheese or Garlic: Split them, spread with pizza sauce, and fill with pizza toppings, or send marinara sauce in a little container for dunking.
  • Breakfast for lunch:  Try toast & scrambled eggs, or perhaps cubed French toast, waffles, or pancakes; serve syrup in a little container on the side.  Don't forget a fork!
  • Cereal:  This can be nice for a change, milk served on the side, of course!  Hot cereal, such as oatmeal or Sunny Boy, kept warm in a thermos is so nice on a cool day.
  • Cinnamon bun:  Sugar for lunch is okay once in a while!
  • Chili, soup, or stew with a bun:  I like making a big batch to be used for suppers and school lunches for a few days.
  • Corn dogs:  This one's in remembrance of my student, Julie, who ate corn dogs almost every day at school!  Keep them warm by wrapping in tin foil or sending in a thermos.
  • Crackers, cheese, kubasa, & pickles:  Cut about the same size and have enough to "come out even" as Frances says in Bread & Jam for Frances by Russell Hoban.
  • Hamburgers & hot dogs:  Good even when cold as far as I'm concerned!
  • Quesadillas:  Between flour or corn tortillas, place leftover pieces of chicken or beef along with (according to your family's tastebud preferences) sauteed onions or sweet peppers and shredded cheese.  Heat a large frying pan to medium-high and brown on both sides until the cheese melts.  Cut into wedges, cool on a rack to help avoid excessive sogginess, then pack them up.  Send sour cream or salsa if desired.
  • Pasta & sauce:  Reheat leftover KD, lasagna, pasghetti & meatbulbs, etc. in the morning and pack in a thermos.
  • Pitas:  These can be miserable things!  My friend Amy's little guy remarked last week that we should call pita pockets "closed pockets."  Very insightful!  Don't bother wrestling with them if the sides are stuck together; pretend they're just like a hot dog bun and fold or roll your fillings inside.  I love pita with tzatziki, lettuce, tomatoes, and cucumbers.
  • Salad:  Mix up some weeds, cut up fresh or dried fruit, some additional chopped veggies like cucumber, celery, peppers, and maybe some cubed or grated cheese, diced chicken, taco beef, or black beans, and add a starch (bun, crackers, breadsticks, etc.) for a well-balanced meal.  Pasta or grains like quinoa could be substituted for the greens.  Include dressing on the side to combat Soggy Salad City.
  • Tortilla chips:  If your child has access to a microwave, pour some chips in a square container and cover with grated cheddar to be heated at lunch for 30-60 seconds.  Send little containers of salsa and/or sour cream if you or your child like these.
  • Tortilla wraps:  Spread your condiments to at least an inch / 2.5 cm from the edge of the tortilla, add lettuce, cheese slices, meat, pickles, etc.  Roll up tightly , secure with toothpicks, and wrap with (sorry to waste resources...) plastic wrap so everything sticks together. My kids like a warning about how many toothpicks I've used so they don't get any unexpected fibre! 

Thanks for coming by the island again and Happy New (School) Year! 


Jennifer       


P.S.  Only 179 more lunches to make... ;-)